All About Picture Rails: Installation and Decorating Techniques - when you visit various blogs about the home will find a lot of interesting house designs and also certainly convenient, and blogs Home Design Inspiration there is one of these blogs that discuss dengn very complete, we have thousands of ready information you get with less free :) okay now we will discuss All About Picture Rails: Installation and Decorating Techniques please read through:

Make Your Own Picture Rail Molding
If you aren't usually one to get out the power tools in order to decorate your home then picture rails might come as a pleasant surprise. Making your own picture rails is pretty easy and means you have a look that is all your own.
 Installation & The Right Height
The only difference between a dado rail and a picture rail is the height they are installed at on the wall. You can easily use what is labeled as a "dado rail" in a hardware store, as a picture rail, and vice versa.
The correct height for a picture rail should be positioned between 12-20 inches down the wall, working from the ceiling. If you have a tall room, then you would be looking at somewhere nearer the 20 inch margin. Before deciding on your final position for installation though, take into account door frames and windows, and adjust the height as necessary.
Make a mark at your chosen height with pencil, and match them up every so often using a spirit level. You could also use a plumb line (chalk line), and stretch it from one measured point to the other and "ping" it, to leave a mark on the wall. You then need to measure your sections of picture rail, working from corner to corner, and using internal or external miter joints (joints cut at 45 degrees), as appropriate - much like when installing crown molding. If you make a cut too short, then do not fear, a filler is easily applied in corners where it won't be easily noticed, and then painted over when dry.
The actual installation of the picture rail depends on your type of wall. If you have a dry-lined wall, then a grip adhesive will be all you need. For installing a picture rail into masonry you can either screw fix them directly into the walls, using countersunk screws, or drill into the vertical studs, if you are affixing it to an internal stud wall.
Decorating Ideas For Above & Below the Picture Rail
If you haven't installed any picture rails at this stage, then decorating is about to get a whole lot easier. If you work from your measurements and decorate above and below the line, as you wish, then you don't need to use masking tape or be particularly neat, as you can then install the picture rail over the top, to hide up any messy edges and joins.
 Picture Hanging
Obviously the conventional use for picture rails is to use them to hang pictures from. It means that all your pictures can be hung at the same height, they are guaranteed to be straight, and have a sturdy and attractive background. You need to get some specialist molding hooks or hanging rods, designed for use with a picture rail, but these are readily available from hardware stores.
For lightweight wall art, you can simply hook the molding hooks over the picture rail, with no further need for affixatives. Heavy objects will likely need a more robust hook, secured to the picture rail with a suitable nail or screw.
Hanging rods are useful for heavy objects such as mirrors, and can be purchased in varying lengths, and again can easily be hooked over the picture rail, and the job is done!
Making sure your picture rails are well finished, installed, and decorated, will make the job of hanging pictures much simpler, and add a feature of note to any room.
after lengthy discuss the design of the house, is reached when an article about All About Picture Rails: Installation and Decorating Techniques ends, but there are many other article that discusses this, but with a different type, simply walking around the other page, if you feel this article helpful, you can book mark or share with a link http://poopypantsmcgee.blogspot.com/2012/02/all-about-picture-rails-installation.html
All About Picture Rails: Installation and Decorating Techniques
Picture rails can add an entire new dimension to a room with very little effort required. Whether you need some advice on how to decorate with an existing rail, make your own picture rail, or just want to know the best way to hang pictures from it, you have come to the right place!
Make Your Own Picture Rail Molding
If you aren't usually one to get out the power tools in order to decorate your home then picture rails might come as a pleasant surprise. Making your own picture rails is pretty easy and means you have a look that is all your own.
There are a couple of different options, however if you don't want to make your own, continue on to the next section!
- Start with a regular piece of timber, to whatever depth and width you require, or you can even use MDF (or a more eco friendly wood alternative), and paint it for a less expensive method of decorating. Next you need to hire a router, these are widely available from hire stores and are easy to use. A router can use different "bits" just like a drill, only it makes shaped indentations into the wood, rather than a hole right through it. Routers come with guides, so you can move your router along the wood with ease, making your shapes as you go - obviously using penciled lines helps with this process too. There are many router bits available, and practicing on a scrap piece of wood is the only way to work out what combination suits you best, however rabbet, corner bead, and bullnose router bits all work well when starting to make picture rail molding.
- Use skirting board instead - this is much the same product it's just where it is placed on the wall that makes it a skirting, dado, chair, or picture rail. You can leave it how it is, if you like the shape of it, or again hire a router to add your own style.

The only difference between a dado rail and a picture rail is the height they are installed at on the wall. You can easily use what is labeled as a "dado rail" in a hardware store, as a picture rail, and vice versa.
The correct height for a picture rail should be positioned between 12-20 inches down the wall, working from the ceiling. If you have a tall room, then you would be looking at somewhere nearer the 20 inch margin. Before deciding on your final position for installation though, take into account door frames and windows, and adjust the height as necessary.
Make a mark at your chosen height with pencil, and match them up every so often using a spirit level. You could also use a plumb line (chalk line), and stretch it from one measured point to the other and "ping" it, to leave a mark on the wall. You then need to measure your sections of picture rail, working from corner to corner, and using internal or external miter joints (joints cut at 45 degrees), as appropriate - much like when installing crown molding. If you make a cut too short, then do not fear, a filler is easily applied in corners where it won't be easily noticed, and then painted over when dry.
The actual installation of the picture rail depends on your type of wall. If you have a dry-lined wall, then a grip adhesive will be all you need. For installing a picture rail into masonry you can either screw fix them directly into the walls, using countersunk screws, or drill into the vertical studs, if you are affixing it to an internal stud wall.

Decorating Ideas For Above & Below the Picture Rail
If you haven't installed any picture rails at this stage, then decorating is about to get a whole lot easier. If you work from your measurements and decorate above and below the line, as you wish, then you don't need to use masking tape or be particularly neat, as you can then install the picture rail over the top, to hide up any messy edges and joins.
Decorating with a picture rail, opens up a whole new dimension in home decor, as there are so many possibilities:
- Decorate the wall all in one color, with the rail painted in white, or a contrasting color for visual interest.
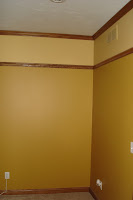
- A more popular approach is to decorate in white or another neutral color, above the picture rail, and a deeper color on the lower part of the wall. This works particularly well in a small room as "opens up" the ceiling, giving a more spacious feel.
- Using a pale color at the bottom, and a darker hue at the top, works especially well in a high-ceiling room, as it has the effect of bringing the ceiling closer down, giving a more cozy feel.
- Wallpaper and picture rails are a superb match. Not only does wallpapering up to picture rail height, make the job of wallpapering easier, it also creates much more impact. A simple white, or color picked out in the wallpaper, painted above the rail, completes the look.


Obviously the conventional use for picture rails is to use them to hang pictures from. It means that all your pictures can be hung at the same height, they are guaranteed to be straight, and have a sturdy and attractive background. You need to get some specialist molding hooks or hanging rods, designed for use with a picture rail, but these are readily available from hardware stores.
For lightweight wall art, you can simply hook the molding hooks over the picture rail, with no further need for affixatives. Heavy objects will likely need a more robust hook, secured to the picture rail with a suitable nail or screw.
Hanging rods are useful for heavy objects such as mirrors, and can be purchased in varying lengths, and again can easily be hooked over the picture rail, and the job is done!
Making sure your picture rails are well finished, installed, and decorated, will make the job of hanging pictures much simpler, and add a feature of note to any room.
after lengthy discuss the design of the house, is reached when an article about All About Picture Rails: Installation and Decorating Techniques ends, but there are many other article that discusses this, but with a different type, simply walking around the other page, if you feel this article helpful, you can book mark or share with a link http://poopypantsmcgee.blogspot.com/2012/02/all-about-picture-rails-installation.html

