Showing posts with label Our Projects/DIY. Show all posts

Wednesday, October 7, 2015

DIY Herringbone Pattern Headboard


Hello superstar readers!  I would like so start out with one more jumbo sized THANK YOU for last week's love.  Taking a few days off has definitely done me some good.  Although I am not diving back into a full time posting schedule just yet, I have been planning out a few new post ideas that I am really excited about.  I was also able to log quite a few hours finalizing the release of my 2016 planner, which was really fun for me to focus on.  For those of you waiting on the new printables, I sincerely appreciate your patience and hope to have them out to you very soon.

I have mentioned in a few recent posts that with our oldest son starting High School this year, our gift to him is a bedroom that better fits his age and lifestyle.  We had already done a few things for his space over the past couple of years, but now I am on a quest to finish it up and create something a bit more cohesive and functional.  So far we have DIY'd a wall study organizer and organized his newly painted armoire.  Today, I am sharing the headboard we recently built for him, which is now the new focal point in his room.


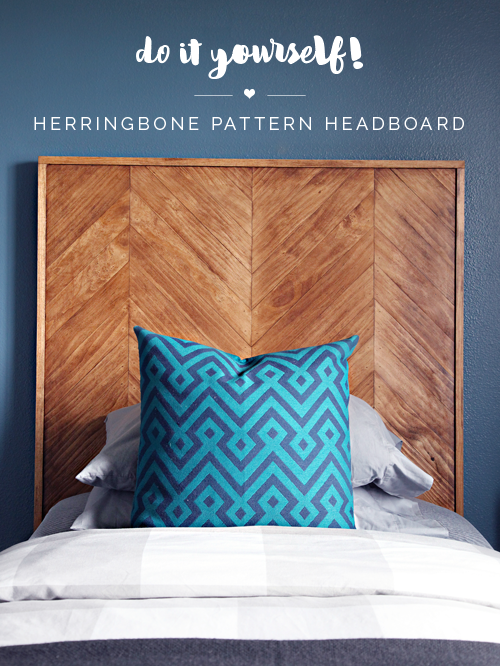
Bryan and I have been wanting to do a herringbone wood project for quite a few years now, so when we discussed potential headboard patterns with Preston, we were excited with his selection.  Although some folks may be ready to say farewell to herringbone as the chevron trend fizzles, I think it is a fantastically classic pattern that we will continue to love for many years to come.


To come up with the final size of the headboard, we added a couple of inches to the width of the mattress and selected a height that would allow the pattern to remain visible above a stack of pillows.

SUPPLIES:

To get started, we drew a template on the piece of MDF to determine measurements and angles (all angles ended up being 45 degrees).  We drew the first line down the center of the board and divided it into four sections to create the pattern.  Then we used one of the 1" x 3" boards to trace the correct pattern size.


The next step was to cut the 1" x 3" boards to fit the pattern.  This was one of "those" projects in which I figured we would just pre-cut all of the boards, glue them in place and call it an easy peasy day.  Then, Bryan stepped in and decided to measure and cut each board specific to the placement on the MDF board based on how the pattern was evolving (to prevent any cuts from being too long or short or creating imperfections and gaps).  The basic steps for this project were to measure, cut, glue, nail and repeat until we completed the entire pattern.

The carpenter's square was helpful in drawing the 45 degree angles on the 1" x 3" boards.


All of the angled cuts were done with the miter saw.


Once a board was cut, it was affixed to the MDF with wood glue.


We initially started the project by also nailing the boards up through the back to prevent the show of any nail holes, however, this was essentially doubling the entire time of an already long project and became more and more challenging as we worked our way to the center of the board.  Eventually, we switched to nailing on the front side.


The carpenter's square was also a really nice aid in keeping the boards straight while nailing.


The plan from the beginning was to cover the entire piece of MDF with the pattern and use our circular saw to slice down each edge of the headboard for a nice and straight finish.  So as we went, the final pine pieces began to hang over the edges of the MDF board.


We used the saw to clean up the perimeter prior to trimming it out with the 1" x 2" boards.


The next step was to fill the visible nail holes.  This normally doesn't make me think twice when we are painting something (we just use whatever wood filler or painter's caulk we have on hand), but being that we were staining this decorative piece of furniture, I wanted to keep them as discreet as possible.

I found a stainable wood filler at Home Depot, as well as a plastic putty knife.


I filled the holes by placing the wood filler on my finger and rubbing it over the hole. I followed behind by scraping everything nice and smooth with the putty knife.


You will know you did a good job if your fingers look like they could be the starring role of a horror film. #gross  After washing up, I went over the entire headboard with a fine grit sanding block and followed up with a vacuum and a slightly damp rag to remove all of the dust.


Once the putty was dry, I grabbed the pre-stain, stain and polyurethane.


Being that I wanted a consistent finish over the entire headboard, I began with a pre-stain wood conditioner which I applied with a brush.

 
After the pre-stain was applied and dry, I noticed that the wood filler became a bit more prominent because it absorbs differently than the actual wood.  So, we went back over the entire surface with the palm sander to remove any excess filler and ensure everything was super smooth.


I applied one more coat of the pre-stain as well as two coats of Early American by Varathane (the same stain finish I used on the wall organizer).  I used a brush to apply the stain in the direction of the wood grain, let it sit for a couple of minutes and then wiped it down with a soft rag (a foam brush also works well for staining). 


I waited 24 hours before applying the second coat of stain.  The nail holes were still slightly visible, but the second coat really helped to disguise them.  Another 24 hours later I applied a coat of the Triple Thick Polyurethane (which dries clear and only requires a single coat).


The initial plan was to hang the headboard on the wall, however, once it was finished it was extremely heavy.  We ultimately opted to affix the headboard to the bed frame by adding two legs with some scrap 1" x 2" boards, which were screwed to the back of the MDF.


Preston sort of initiated this makeover by moving his bed to the center of his room one day... Now it is the statement maker of the entire space!


The warmth of the wood partners really nicely with all of the blues and grays throughout the room.


We still have a few things planned to really finish up the space; such as adding in some art, photos and personal items, as well as updating the lighting situation.  I am still toying with the idea of adding a very subtle pattern to the upper portion of the room (and maybe even painting the decorative moulding).  Once I finish installing the remainder of the items and organize a few of the piles sitting in the corner, I will show how the entire space pulls together.  Until then, you will find us all randomly popping our heads into Preston's room just to ooh and ahh at our latest project.  That's not at all annoying to a teenage boy, is it?


We always learn something with each project and maybe would have done a thing or two differently.  It was not necessarily difficult, just extremely time consuming with the amount of measuring and cutting it required (a perfect project for a day of watching football).  We definitely could have simplified the pattern and cuts but I am so very happy we didn't.  And if you really wanted to prevent any nail holes on the face, I think the pieces could have simply been attached with a construction grade adhesive, and they would have remained in place just fine once framed out.  

As excited as I am about how the project turned out in general, the sentimental side of me really loves that Preston now has a piece in his room built by his parents.  And it is also a piece he can take with him when he heads off to college someday, or even hand down to his own kids.  #mushymom

Monday, September 21, 2015

Do it Yourself: Floating Laminate Floor Installation


We have finally 100% completed our flooring install.  It was about 90% done for a few months now, only waiting for some specific finishing cuts and transition pieces... Funny how we get a project to a point of being done enough to use it and work around it and then put off those last few hours of finishing work.  Don't follow our lead on that. #wink


We have been receiving quite a few emails with questions regarding our upper level flooring selection.  Why didn't we install it under the cabinets?  Why did we select laminate?  Does it show dog hair and dirt?  Is it loud?  How has it been holding up?  How did we install it?

And now that we are finally finished with the installation process, we are finally going to answer all of those questions and more today.  

Our first step was to source and purchase the flooring.  Here are some of the items we considered while searching for our floors:
  • Our home's existing aesthetic/finishes - We installed TrafficMaster Allure Vintage Oak Cinnamon Resilient Vinyl Plank Flooring in our bathrooms (guest and main) and throughout our lower level a few years ago, as well as beautiful American Walnut stained wood stairs.  It was important to find something that would compliment our existing flooring finishes. 
  • Durability - Dogs and kids and a Jen, oh my!  Finding something that could stand up to heavy wear and traffic was a must.
  • Style - We set out to find an oak hardwood or something that achieved the same look.
  • Cost - Price is always a factor with any project we do, as well as ensuring we stay on budget and consider all of the high/low options.
  • Installation - We really wanted to try and find a flooring we felt comfortable tackling on our own.  The installation of flooring can often times cost more than the actual floors themselves. 
  • Ratings - It is always important to look for photos and testimonials of the items we are investing in.

We sourced flooring samples from Home Depot, Lowes, Lumber Liquidators, Build Direct and Best Laminate. Some samples were ordered online while others were picked up right within local stores.  We continuously compared samples in different areas of our main living spaces at different times of the day until we whittled our pile down to all of our favorites.


We fell in love with a pre-finished oak hardwood, however, it was the first one to fail our key test.  And it failed badly.  We took a key and rubbed it across the surface of each sample to see how easily it would be scratched and marred.  The true hardwood took on the most damage while the floor we ultimately selected fared quite well.  After considering all of the items above, we ultimately selected Home Decorators Collection Cotton Valley Oak Floating Laminate.  It was nice and thick, wasn't too orange/red, seemed quite durable, matched well with our existing flooring, looked similar to the inspiration oak hardwood and we could install it ourselves.  To top things off, the price was great and came in far under our estimated flooring budget.  Winner, winner!


So what is a laminate floating floor?  Here is the technical definition I found on Google for you -

"A floating floor is a floor that does not need to be nailed or glued to the sub-floor. The term floating floor refers to the installation method, but is often used synonymously with laminate flooring but is applied now to other coverings such as floating tile systems and vinyl flooring in a domestic context."


To prepare for our order, we measured our entire upper level square footage, and did not subtract out anything the floor would be installed around.  We knew there would be some waste and we didn't want to end up without enough, so we over-purchased.  We ordered a total of 42 boxes of flooring, 6 rolls of underlayment foam and two transition pieces (to install where our laminate flooring meets carpeting).

The first step was to install the underlayment foam.  Some floating floors will have this pre-attached, however, ours did not.  The underlayment acts as a barrier between the floating floors and the sub-floor.  The thicker the foam underlayment, the quieter and cushier your floor will become (the underlayment is available in a variety of thicknesses and qualities at various price points).


Our underlayment foam had an adhesive edge, however, we also opted to staple it down to prevent any shifting during installation.

As you can see above, we decided to install our flooring to run parallel to the longest main wall.  Our previous floors were installed in the same manner and we preferred the look and felt it made the room appear longer and wider.  The first row was installed with the flooring tongue facing the wall, about 3/8" away from wall edge to allow for expansion.  We also started the row with a piece cut in half to ultimately create a staggered effect.

The best part?  The only tools we needed for the majority of the installation were:
  • Tape Measure
  • Pencil
  • Miter Saw

I know right?  And to show how truly easy it was to click the floor together, I made you the most anticlimactic video in all of the DIY land.


But as you know, anticlimactic is a VERY good thing in the world of DIY!  We don't want challenges and frustrations, we want easy-to-install floors!

Just measure and cut...


And then place and lock by sliding each new piece of flooring into the over-lapping end joints and pushing down to engage (the image above was a specific angle cut for the hallway, majority of the cuts in the main living areas were 90 degree angles).


One piece after another, pulling from random boxes and staggering along the way for a good grain variation.


When it came to the kitchen, we actually had to install our cabinets and island first, and our flooring second.  It is important to remain cautious of the amount of weight being added to the tops of the floors because they will naturally expand and contract with the weather/temperature changes.  This is also why it is important not to place the flooring tight up to any of the wall or cabinet edges.  The inability to naturally expand and contract may cause the floor to buckle, and that is not a risk we wanted to take knowing how heavy our cabinets paired with the quartz counters would become.


Our cabinets were installed on legs (that were provided with the cabinets), while our custom center island came with a built-up base.  To ensure that our dishwasher and fridge panels were installed at the appropriate heights, we did place temporary pieces of flooring down for measuring purposes and to keep things level until the remainder of the floors were run through the kitchen.


As you can see below, the floors were installed up to the legs under the outer cabinets and with a very small gap around the island base.


Once our oven/downdraft situation is finalized and installed correctly, we will add the final pieces of toe-kick to our island, as well as matching quarter round.  The IKEA white toe-kick is designed to clip right to the legs below their cabinets, yet on top of the floors (we had to rip the toe-kick trim to the correct height).


Although we did not install the cabinets on top of the flooring, our appliances sit on top of the floors for a seamless look (and to make appliance swap-outs and repairs easy down the road).


The image above is how we had been living with our hallway for the past few months.  Up until the hallway, the floor only required straight, 90 degree cuts.  However, our hallway was a combination of doors and angles and took almost as long as the living/kitchen area combined.


Bryan tried installing the flooring both with a door jamb installed and with it completely removed.  Although he thought he would save a little time but not removing the jamb, he ultimately decided it was much easier to just take them out all together until the floors were done.  Above is our guest bedroom door with the jamb still attached.  The floor needed to run under the jamb, so the jamb had to be shortened with our oscillating tool to slide over the top of the floors (ultimately making it easier to just remove future doors).


When it came to the smaller angle cuts, he had to get a little more creative.  For those with a straight edge, he used his sliding t-bevel to determine the exact angle and measurements.


While smaller pieces and those with multiple points were planned and cut on scrap paper first.


A combination of his jig saw, miter saw and table saw helped him with the more intricate cuts.


Door jamb completely removed and much easier to work around!


Once the floors were completely installed, it was time to install the new transition pieces.  Although we had transitions with our previous laminate, they were not the same/compatible with the new flooring.  We began by removing the old metal strips and screwing in the new ones (which are included in the packaging with the transition pieces).

Step One - Remove previous transition hardware


Step Two - Measure door opening


Step Three - Cut metal transition piece to size with a snips


Step Four - Screw new transition strip in place


Step Five - Measure and cut door stop moulding notch from transition piece with jig saw


Step Six - Snap transition piece into installed hardware


And celebrate, because you just finished installing your floors!


Here is a shot of the new laminate floor paired with our previously existing bathroom vinyl plank flooring.


The floor and door trim can then be installed on top of the floating floor (affixed to the walls, not to the flooring).  We went with this base trim and casing from Home Depot.


We used a jig saw to cut out our heat registers, which we then glammed up with pretty covers.


Once our project was complete, we had a total of five extra boxes and one extra underlayment roll, which we were able to return to the store.  Total cost of the flooring, transition pieces and underlayment came in at around $1300.00.

Now, let's take a moment to chat about how happy we are with our flooring choice.

I wouldn't trade them for any other floors as of this very moment.

These floors have held up really well to our daily use, even as we continue construction on top of them.  Not a single scratch has been found yet, they look as beautiful as the day we installed them (even if that was just last week for some of the pieces, ha).

They hide dirt which is probably a good and bad thing, but I appreciate that I am not worried about sweeping/mopping around the clock.  We do have dogs and if they come in with wet paws, the prints do not completely vanish once dry.  And the white dog hair is easily spotted.

We are happy with the overall sound barrier the underlayment seems to provide, our large dogs will most likely sound like horses on any flooring.  However, our open concept does tend to bounce sound a little more, while the floors do a good job absorbing much of it.  I keep telling Bryan more rugs are also the answer.

To maintain the floors, I was using a homemade mixture and my spin mop, but I wasn't 100% happy with the results.  After some reading, I learned that many home solutions can slowly dull the protective floor finish, as can using too much water.  So I made the switch to Bona from Home Depot and it cleans so much better than anything I had made myself prior.


Every day or two I use a microfiber dust mop just to pick up hair and dust.


And every week or two (or as needed), I use a spray mop paired with a microfiber head and the Bona.  The floors dry polished and completely streak free.


We are "floored" at how much we love these new floors, and how they have really created an expansive and cohesive flow throughout our upper level, and even throughout our entire home.


I hope I answered all of your questions, but if not, feel free to leave any new ones in the comments below and we will do our best to keep the post updated with anything we may have missed.

This post was in no way sponsored.  We personally purchased all of the items we talked about today and are happy to share our true experience.