How to Make Big Poofy Wedding Bows: Easy Directions to Success - when you visit various blogs about the home will find a lot of interesting house designs and also certainly convenient, and blogs Home Design Inspiration there is one of these blogs that discuss dengn very complete, we have thousands of ready information you get with less free :) okay now we will discuss How to Make Big Poofy Wedding Bows: Easy Directions to Success please read through:

We've looked at lots of different ways to make bows so far, from pew bows, chair back bows to arch bows, but the big poofy wedding bow is the most versatile of all. Learn how to make this beauty and you'll save loads of money of your wedding budget.
What's The Best Material To Use for Bows?
It largely depends on what areas you are decorating with your big poofy wedding bows as to the best material to use, but overall the best results will be gained from using quality stiff ribbon or fabric, or wired ribbon (ribbon that has thin wire running down each edge).
The idea behind using a stiffer fabric, or ribbon with wire edging, is that the bows will be more likely to stay put, and will definitely retain that "poofy" look that we are striving for. A more relaxed and soft bow will be created by using softer fabrics, and using this kind of ribbon is fine if you are making small poofy bows, or bows to decorate chair backs for weddings.
If you find the perfect fabric but it's not a ribbon, you can cut strips of it to your chosen width and length, making a small allowance for hemming or zig-zag stitching the edges, so they don't fray.
For a poofy bow suitable for a larger surface like an arch or tree, the ideal width of your ribbon or fabric strip should be at least 6 inches, and the length for each piece should be about 2 yards - this is obviously flexible depending on how full you want the bow to look. It is worth taking some time with the first bow before cutting up a large supply of ribbons of the same length, as you can then adjust the dimensions accordingly.
Tips on Tying Bows & Getting Them to Stay Put
The following steps will take you through creating a full bow that has 4 loops for a right-handed bow maker, but the instructions can be changed according to your needs:
Quick Tips & Tricks for Making Poofy Bows
Here are a few tips you can use to make the process easier, or to make your bows more poofy:
Image credits - http://www.flickr.com/photos/eolson/3967399237/sizes/z/in/photostream/
after lengthy discuss the design of the house, is reached when an article about How to Make Big Poofy Wedding Bows: Easy Directions to Success ends, but there are many other article that discusses this, but with a different type, simply walking around the other page, if you feel this article helpful, you can book mark or share with a link https://poopypantsmcgee.blogspot.com/2012/03/how-to-make-big-poofy-wedding-bows-easy.html
How to Make Big Poofy Wedding Bows: Easy Directions to Success

We've looked at lots of different ways to make bows so far, from pew bows, chair back bows to arch bows, but the big poofy wedding bow is the most versatile of all. Learn how to make this beauty and you'll save loads of money of your wedding budget.
 |
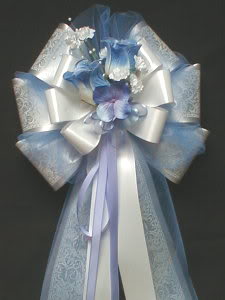
| Mix and match materials and styles for a unique look |
It largely depends on what areas you are decorating with your big poofy wedding bows as to the best material to use, but overall the best results will be gained from using quality stiff ribbon or fabric, or wired ribbon (ribbon that has thin wire running down each edge).
The idea behind using a stiffer fabric, or ribbon with wire edging, is that the bows will be more likely to stay put, and will definitely retain that "poofy" look that we are striving for. A more relaxed and soft bow will be created by using softer fabrics, and using this kind of ribbon is fine if you are making small poofy bows, or bows to decorate chair backs for weddings.
If you find the perfect fabric but it's not a ribbon, you can cut strips of it to your chosen width and length, making a small allowance for hemming or zig-zag stitching the edges, so they don't fray.
For a poofy bow suitable for a larger surface like an arch or tree, the ideal width of your ribbon or fabric strip should be at least 6 inches, and the length for each piece should be about 2 yards - this is obviously flexible depending on how full you want the bow to look. It is worth taking some time with the first bow before cutting up a large supply of ribbons of the same length, as you can then adjust the dimensions accordingly.
 |
| Take it one step at a time and you'll be fine |
The following steps will take you through creating a full bow that has 4 loops for a right-handed bow maker, but the instructions can be changed according to your needs:
- Start by securely holding your length of ribbon in your left hand hand, in the middle (fold in half to find the mid point accurately).
- With your right hand make a loop to one side of the center, and hold it in place at the center, with your left hand.
- With your right hand, make a loop on the other side of the bow and hold with your left - meaning both lengths that are hanging eitherside should be the same, and you now have 2 loops
- Make a small ring shape (as opposed to a large loop) with one side of the ribbon - make it big enough to thread your ribbon through later on.
- Repeat steps 2 and 3.
- Take a second piece of ribbon, either the same length, or a half length. Holding all your loops together with the left hand, pass the second piece of ribbon through the ring shape you made (like threading a needle). When you have threaded half your ribbon through this small loop, take both ends and wrap them around the middle.
- Finish by tying a knot with this second piece at the back of the bow. The ends can hang down to join the other loop ends in making the tails of the bow.
 |
| Use spray starch for a bit of staying power |
Here are a few tips you can use to make the process easier, or to make your bows more poofy:
- If you find it difficult to hold so many loops in your hand while making the loops with the other, try using a bulldog clip or hat pin to hold the loops in place, as you use both hands to make the loops.
- If you've found the perfect design fabric for your wedding but it isn't stiff enough to use for poofy bows, try using spray starch once you've completed your bows to stiffen up the fabric and keep it in place.
- To make the loops look more full on big bows, try using strips of plastic made into rings or loops, and pushed underneath the top layer of the loopy end of the loops, pushing them out and making them look more full. Use a small blob of white glue underneath, or a dressmakers pin to secure. You can reuse plastic packaging, such as yoghurt pots, etc., to make your strips.
Image credits - http://www.flickr.com/photos/eolson/3967399237/sizes/z/in/photostream/
after lengthy discuss the design of the house, is reached when an article about How to Make Big Poofy Wedding Bows: Easy Directions to Success ends, but there are many other article that discusses this, but with a different type, simply walking around the other page, if you feel this article helpful, you can book mark or share with a link https://poopypantsmcgee.blogspot.com/2012/03/how-to-make-big-poofy-wedding-bows-easy.html

