Showing posts with label Nancy Zieman. Show all posts

Wednesday, May 29, 2013

Serge With Confidence: Part 5

May Book Blog: Serge With Confidence by Nancy Zieman
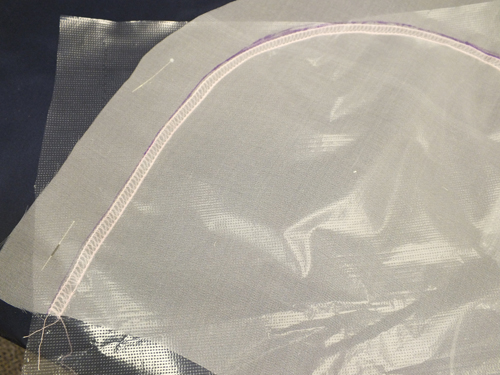
Our last and final blog on our little serged baby set is a relatively easy lesson, since you have already cut out and serger shadow stitched your bonnet piece using the cover stitch. If you haven’t already cut out a batiste lining piece, do so now using your embellished organza top layer. Secure the layers together, wrong side of organza to right side of batiste, using pins or KK 2000. Serge with an overlock across the bottom and then around the curved edge.

Turn up the bottom hem to the wrong side so that the serged edge just overlaps the lower edge of the shadow stitching(you should be able to see it through the fabric).

Press and take to the sewing machine. Topstitch on the right side just beside the  shadow stitch line in thread color that matches your project. The stitching will catch the hem on the wrong side.

Now since your bonnet piece is curved all the way around, you will need to ease in the hem. Run two gathering threads at least 4.5 inches long 5/8 inch and 1/4 inch from the curved edge.

Pull the threads around the curve gathering slightly so you can fold the edge under to slightly overlap the shadow stitching line.


Press. Straight stitch from the front around the outer edge, just as you did across the hem edge. This will create your casing. (You will have some gathering on the wrong side of the fabric, but since the bonnet is drawn up with a ribbon, this is fine.)


Run a ribbon through the casing using a safety pin.

Pull up the bonnet to fit. To secure the bonnet shape, stitch through all layers (including ribbon) at the edge of  shadow stitching beyond the casing opening.

Tie knots in the end of each ribbon.


Gift a new baby girl with this sweet little serger set.


-Amelia

Friday, May 24, 2013

Serge With Confidence: Part 4

May Book Blog: Serge With Confidence by Nancy Zieman
Now that our decorative work is done on all our organza pieces, it’s time to construct our little jacket. For the most part, I followed the construction process given in the pattern, with these exceptions:

First, place each organza piece to each batiste piece, wrong side of organza to right side of batiste, and baste around the edges to join.


Treat as one from this point on.

Change your serger setup to a three- or four-thread overlock stitch and finish the jacket edges along the front facings. Fold the facings to the right side of the garment along the foldline and stitch across the facings 3/4 inch from the top just to the end of the serged finish and 1-1/2 inches from the bottom across the facing. 

Mark all the way around your neckline edge 1 inch from the shadow-stitching line.


Serger finish around the neck on the marked line (with the facings still turned back).


Stitch up your side seams making sure to align the shadow stitching.


Finish with the serged edge. (You could serge only, but you run the risk of misaligning the shadow stitching). 

Serge all the way around the bottom edge of the jacket (facings are still turned back.)

For many serged baby items, you could serger finish the neckline and simply fold back the narrow edge and topstitch to finish. For this design, however, I needed the turned-back edge to meet the shadow stitching, and to fold back a wider finish along a curve requires you to clip the curves into the finished, serged edge. You could do this, however it leaves raw fabric along the clips and isn’t a very attractive finish.


Instead I suggest finishing with a bias strip from the batiste. Cut the strip 1-3/4 inches wide. Fold it in half and press in a circle shape echoing the shape of the your neckline. With the raw edges of the bias aligned with the raw edges of the jacket and working on the right side of the jacket, sew around the neckline with a 1/4-inch seam. Trim the ends of the bias so they overlap the turned-back facing approximately 1 inch. Clip the curves, turn the bias binding to the wrong side, turn the facings to the inside of the jacket (this will also flip the bottom hem up as well) and press around the neck, the hem and down the facings. The bottom hem should meet or be positioned slightly beyond the bottom shadow stitching.


To secure you could hand blind stitch, but it is just as clean and easier to topstitch so that your topstitching lies right beside the shadow stitching line. Use thread to match the garment fabric on the shadow stitching (in this case a fine cream thread). The stitching is barely detectable and you catch the hem on the underside.


The neck bias aligns just beyond the edge of the shadow stitching as well, and you will secure it in the same manner.


Serger finish your sleeve edges, turn up the hem to the shadow-stitching line, press and topstitch as for the jacket. Stitch the sleeve seams aligning the shadow stitching and finish the seam allowance with a serger.


Gather the sleeve cap and set into the garment, finishing with a serged edge. This is a small area to work in, so stitch slowly and carefully.

Add a ribbon closure as instructed in the pattern.


Apply a clear snap on the underlap to secure.

Next week, we will tackle our little drafted bonnet to complete the set.

And on a side note, I actually chatted with Nancy Zieman at Quilt Market in Portland; she was signing copies of her Sew Knits with Confidence book at the F+W booth. And she assured me that my suggesting you catch a skipped stitch with a needle and thread was perfectly acceptable. So we can all relax and forgive our little sewing flaws. 

-Amelia

Thursday, May 16, 2013

Serge With Confidence: Part 3


May Book Blog: Serge With Confidence by Nancy Zieman

Before dashing off to Quilt Market this week I was able to take a stab at cover stitching our project. First, however, I have to give a shout out to Cathy Krejci at the wonderful new Pins & Needles location in Middleburg Heights, Ohio. Cathy has helped me with serger issues in the past, and when I couldn’t get my machine to stitch properly  a pretty serious issue, given the focus of this blog is to encourage you all to use your sergers  we took a look at the machine together and realized the needle casing was cracked (the needle was jutting forward instead of straight down when fully tightened). Word to the wise, be careful when you tighten your needles. So off my serger went for servicing while Cathy was kind enough to let me borrow hers for this project. We threaded the looper with the pink wooly and she advised me to use regular pink serger thread in the needles. For the cover stitch we’re doing, you only need three threads. I stitched out a test on my organza without the Solvy (wash-away stabilizer) and it tunneled slightly. Cathy advised me to reduce the differential feed to 0.7 from 1.0, and I added the Solvy under my organza.


The results: perfection. Aligning the inner needle with the traced line on my organza jacket, sleeve hem and bonnet curve, I simply stitched from one edge to the other. 


Once I finished stitching, I gently tore away the Solvy; 


the rest will rinse away when the garment is washed.

Tip: To get enough thread to pull out for clipping at the edge of your project, turn your hand wheel away from you until the needles go down and up; then lightly pull and clip the threads so that you have tails not only on your project but enough thread extending from the needles and looper for your next round of stitching.

Tip: If you find you haven’t stitched straight and want to re-stitch (not advised too many times on organza) cover stitching is easy to pull out. Simply clip down the back of your stitching (the wooly looper threads) being careful not to catch your fabric, then tug the needle threads from the edge of your project and the stitching comes right out. Remove the Solvy and press with the tip of the iron to close the needle holes and re-stitch.

Tip: Nancy and other serger experts might cringe at this, but I’m a true believer that necessity is the mother of invention. After stitching my bonnet curve perfectly along the traced line the very first time, I noticed that I had one stitch where the looper thread did not get caught by the left needle — the dreaded skipped stitch. 


Instead of pulling the threads out and starting over, I threaded a hand needle with my pink top thread, secured it with a tiny tight knot on the wrong side at the edge of a secured wooly loop, caught the loose loop on the back side and tacked it to the straight stitch so that was aligned where it should have been caught. Then I stitched up through the next needle hole, over one stitch on the right side and back down into the next needle hole before tying off.


It’s virtually undetectable from the right side and saved me from having to restitch anything.

Next week, we’ll construct our little set. 

-Amelia

Friday, May 10, 2013

Serge With Confidence: Part 2

May Book Blog: Serge With Confidence by Nancy Zieman

I asked you last week to gather your materials, but two things I failed to mention were KK2000 Temporary Spray Adhesive and Roxanne’s Glue Baste-It. Since we’re working with two fabrics, the spray is handy for adhering the layers together, particularly since organza against batiste is a very slippery proposition. I personally like to lightly spray the surface of the batiste and layer the organza on top before cutting out the pieces, so they will be cut out the exact same size.


Roxanne’s glue is an option to baste stitching hems in place prior to stitching. Also, pre-wash both your fabrics before starting. And I’m thinking when we get to the cover stitching next week, I may try it with some wash-away stabilizer first since organza might need the extra support; so have that on hand. 

Another tip I should have mentioned last week before getting started is to check the availability of wooly nylon threads before you decide on your batiste color. My initial thought was to use blue, but Gutermann’s Bulky Nylon, which is available to me locally, didn’t have a shade of blue that would work. So instead, I’m using cream batiste, white organza and pink thread for the cover stitching.

Preparation:
1. Before we can start with the decorative part of serging our project we have to cut out the jacket pattern, which if you’re using Burda 9645 are pieces 14, 15 and 16. I altered the pattern in two ways. First, I preferred a straight sleeve rather than the slight bell design given in the pattern, so before cutting out, I folded the sleeve pattern straight down from the underarm on both sides.


2. Second, since I didn’t want the cover stitch to be altered in appearance over the shoulder seams, I overlapped the front jacket piece and the back piece on the 5/8-inch seamline, pinned it together and cut it out as one on the fold.


I used the adhesive spray and cut both my batiste and organza layers out together, but you may prefer to cut them separately. Set all the batiste pieces aside for now.

3. The cover stitching will be done on the organza jacket layer. The trickiest part here is making sure the cover stitch will be at the same level across the bottom of both the front jacket and back jacket, so when you join the jacket at the side seams, the shadow stitching lines will match up. Measure up from the bottom of the organza jacket piece 2-1/2 inches. Take a heat or water-soluble marking pen and mark all the way across the bottom on both front and back.

4. Mark 1-1/4 inches in from the neckline all the way around the jacket opening, measuring in from the facing fold when you get to that point. Since you’re working with sheer organza, it is best to place it on top of a dark surface in order to see the edge of the fabric.


Bonnet Preparation:
For the simple bonnet, you’ll need to create a single pattern piece that looks basically like a big gumdrop.

1. Trace off a rectangle 6 inches deep by 15-1/2 inches wide. Draw a line down the center of the rectangle. Measure up 7 inches from the center and make a point. Starting at the right corner of the rectangle, draw a curve up to the center dot. Repeat for the other side.


2. Cut out an organza and a batiste bonnet piece; set the batiste piece aside.

3. To mark the organza bonnet for cover stitch, measure up from the straight lower edge 1-1/2 inches and draw a guideline across. Measure in 1 inch around the curved edge and draw a guideline completely around. 

Next week we will tackle our cover stitching on our organza overlay pieces.

-Amelia